Frequently Asked Questions
These questions have come up repeatedly over the years, and we have provided explicit answers for all of our users.
Select a topic from the list below.
- HOW DO I enter medications for a student?
- HOW DO I set up protocol medications?
- HOW DO I create templates for clinic visits?
- HOW DO I input screening results for a group of students?
- HOW DO I find students without screenings?
- HOW DO I send out screening notices to a group of students?
- HOW DO I get screening results and reports?
- HOW DO I send out immunization notices to a group of students?
- HOW DO I save selection criteria for a report?
- HOW DO I use e-mail to send out reports?
- HOW DO I include (embed) specific data in a form or letter?
- HOW DO I document administrative tasks?
- HOW DO I use the To-Do clock?
- HOW DO I set up for the Medicaid Billable report?
- HOW DO I run the Nurse's Time (Range) report?
HOW DO I: enter medications for a student?
Entering medications for students is a pretty straightforward process.
Here are the steps:
Student Information – bring up the student's record and click
on the Medications tab.
Click on Add a New Med and find the med in the drop down list
next to Medication.
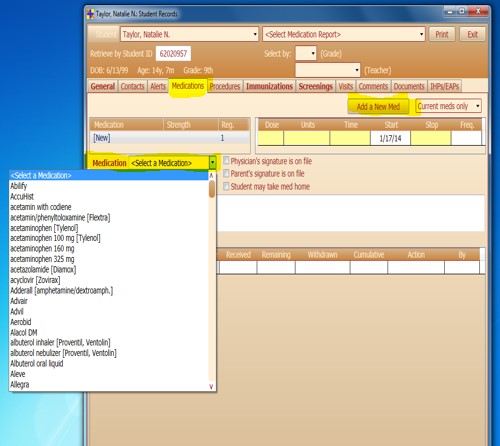
Fill in the highlighted fields for that med related to Strength,
and then the Dosage in the grid in the upper right portion of the
tab. Any other informational fields such as whether the Parent's signature
is on file or the Notes/Instructions can be entered, but
are not required.
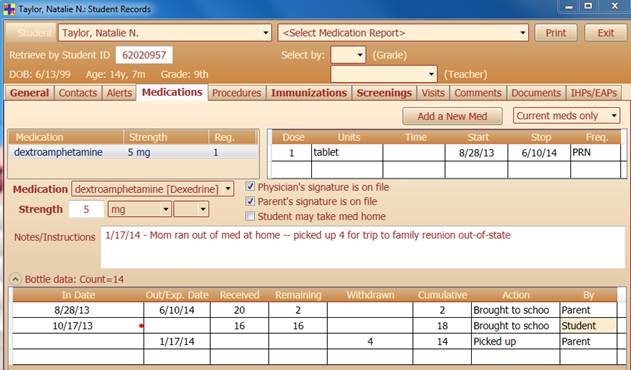
If the med is something that can be counted (tablets, capsules, teaspoons etc.), in
the Bottle data data area, enter the date the med was brought in (
In Date) and the number Received. Other informational
data in this grid such as the Out/Exp. Date can be entered, but are
not required. Note however that expiration dates are honored in the Meds and
Procedures form and will not be allowed to be administered after the date
entered. As meds are administered to the student, the number in the Remaining
column should be reduced and should always reflect the actual count <
for that bottle.
Having done the above, save the record either by double-clicking on the 'Student' label
in the upper left portion of the window or by exiting the record. This student's
medication should now appear on the Meds and Procedures form where it
can be quickly and easily recorded when the child comes to your clinic. If this med is
set up as a PRN, then in order to see it on the Meds and Procedures
form you must check the box that allows displaying PRNs.

When your supply of a child's med is running low or completely out, you may receive
another batch which you will want to document on the student's Medication record.
Simply click on Allow Changes and an additional blank line will be
added in the Bottle data area. When you enter the number received
the Count should be updated.
Similarly, if a parent wants to take away meds, you would click on Allow
Changes and then enter the date they were taken in the Out/Exp.
Date column and the number taken in the Withdrawn field.
Again, the Count should be re-calculated for that med.
If for some reason the initial count (Received) was entered
incorrectly, you may adjust this amount by simply retyping the number in the
Received column. You will also be given the opportunity at that
time to enter the number remaining in the bottle, since there would be no other
way to adjust this number. Other pill count adjustments should be made by either
adding or withdrawing pills on separate lines of the Bottle data
grid. These adjustments should include the reason for the adjustments.
Return to top
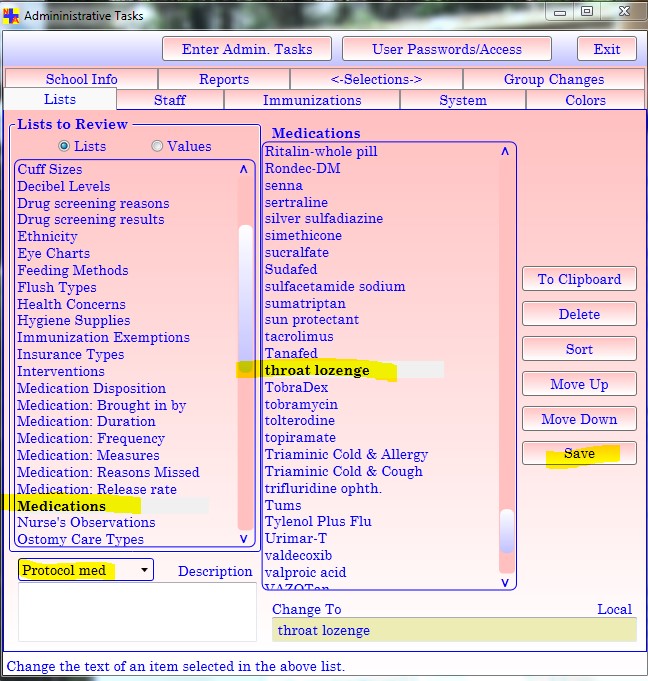
HOW DO I: set up protocol medications?
Let’s say you have throat lozenges in your clinic which you want to be able
to give to any of your students. We refer to medications of this sort as 'protocol
meds'.
To set up throat lozenges as a protocol med, go to Administrative Tasks
and click on the tab called Lists.
In the left column click on Medications.
Now in the middle column, you will see a list of medications. (You can add, delete
or change any item in this list by clicking the med and then using the commands on
the right. Be sure to Save before exiting this screen.)
Click on 'throat lozenge'.
Near the lower left corner, click on the drop-down arrow and chooseProtocol
med.
"Click on "Save.
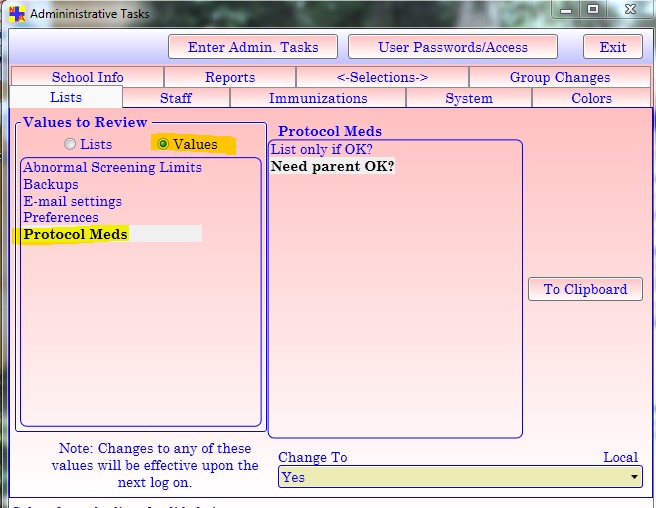
There is a second step which determines whether you will see these protocol meds
listed for each student during a clinic visit.
Again in Administrative Tasks, click on the Lists tab.
This time click on the Values radio button above the list on the left.
In the list on the left, click on Protocol Meds.
Now in the middle column, click on the top question: List only if OK?
". You have a choice of 'Yes' or 'No'. If you choose 'No', you will
see all of the protocol meds listed for each student (and be allowed to show
whether you have documentation for giving the med). If you choose 'Yes', you
will only see the protocol meds for students who have turned in a permission
slip authorizing you to give that med. Our recommendation would be to choose
'No'.
For the second question: Need parent OK?, the answer will
probably be 'Yes', indicating that the parent/guardian needs to provide an OK
for you to give that med.
Return to top
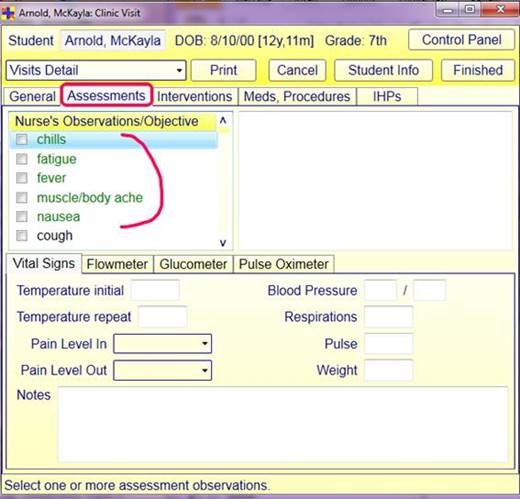
HOW DO I: create templates for clinic visits?
Surely you have some clinic visits that occur frequently and repeatedly -
- think complaints of headache, stomach ache, sore throat etc. Or you have visits
for which you want to be sure you are covering all possibilities –- think head
injury. It’s easy to set up templates for these conditions and/or situations.
There are actually two ways to set these up.
The first is to open a visit for a student with the type of visit for which you
want to make a template; for instance, here’s how to create one for a headache.
Check off applicable choices in the lists on the General, Assessments
and Interventions tabs. To the right of the
Save as >> button, give your template a unique name, and then click on the
Save as >> button to save the template.

From now on, that template will appear in the dropdown list of Template
choices. When you choose that template, the choices you made will appear
in green
at the top of each list. You can then
individualize the visit by choosing the appropriate items for that child/visit.
Of course you can also make additional choices from these lists at the time of the visit.
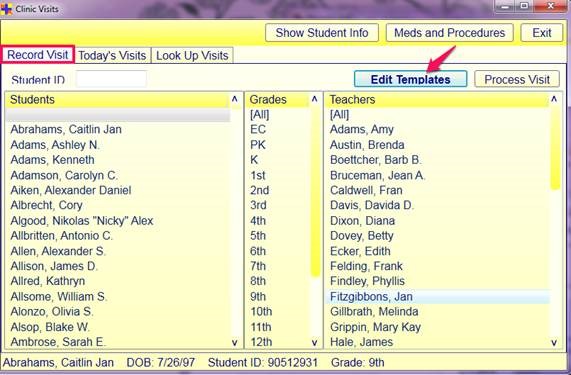
An alternative way of setting up templates is found on the Record Visit
tab within Clinic Visits. The process is similar to that
described above, but does not involve actually using a real clinic visit. In this
case you just fill in the choices you want and save them under a unique name. This
is the only way an administrator can set up a template, since administrators can’t
edit clinic visit records.
If needed, you can change or add to what has already been set up for you in each template;
make changes and be sure to click on the Save as >> button.
Using the templates will not only save you some time and keystrokes, but possibly
serve as a reminder of all that you should be considering for documenting each visit.
Return to top
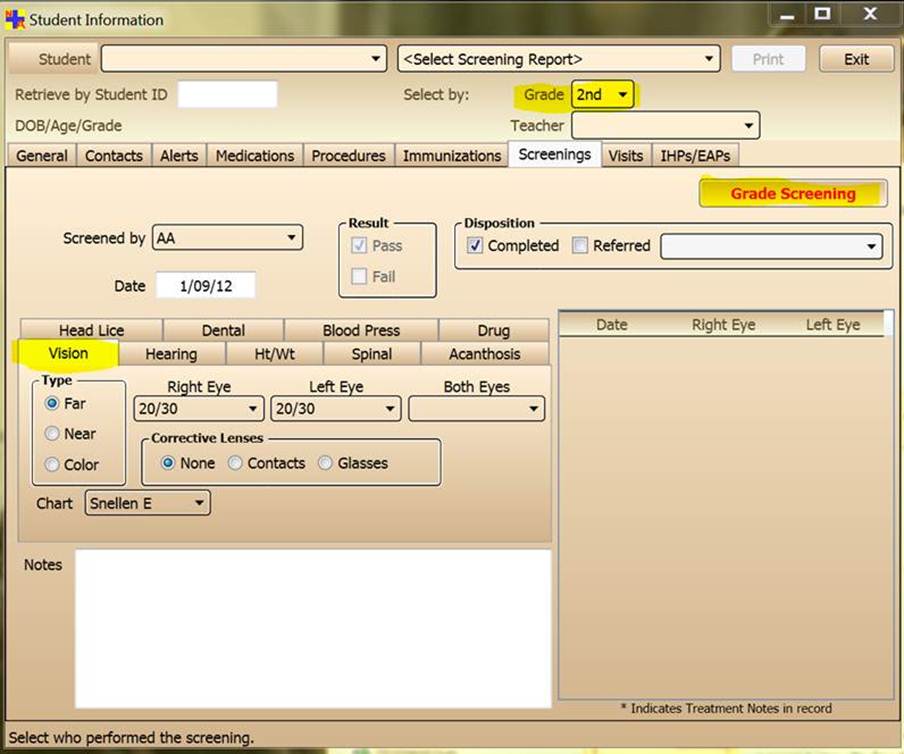
HOW DO I: input screening results for a group of students?
Go to Student Information / Screenings (tab). You can enter
a single screening by bringing up the student’s name, choosing the type of screening
and then clicking on the New button and entering the data. But you
can also enter multiple screenings for an entire grade level or a particular teacher’s
class.
For a grade level, click on the drop down arrow next to Grade (top
of form) and then choose the grade. Fill in the fields on the rest of the tab for
that screening. Next click on the Grade Screening button.
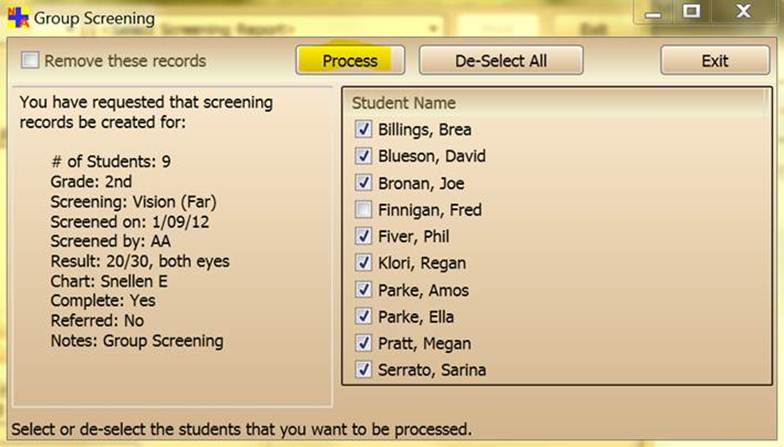
Note: while most users will do this for all the students who passed the
screening, some users have come to realize that you can fill out the data in a way
that comprises the results for any group of students. So, if you have a group of
students that all have the same results, you can enter them all at once using this
technique.
On the new form that is shown, uncheck any students whom you didn’t screen or who
do not match the screening values entered. Simply clicking on Process
will enter the results for the remaining (checked) group of students.
Then go back to the individual students who were not included in the group
screening checked list and enter their results one at a time.
To do a group screening for a teacher’s class, click on the drop down arrow next
to Teacher (top of form) and then choose the teacher’s name.
From here, proceed as with a grade screening.
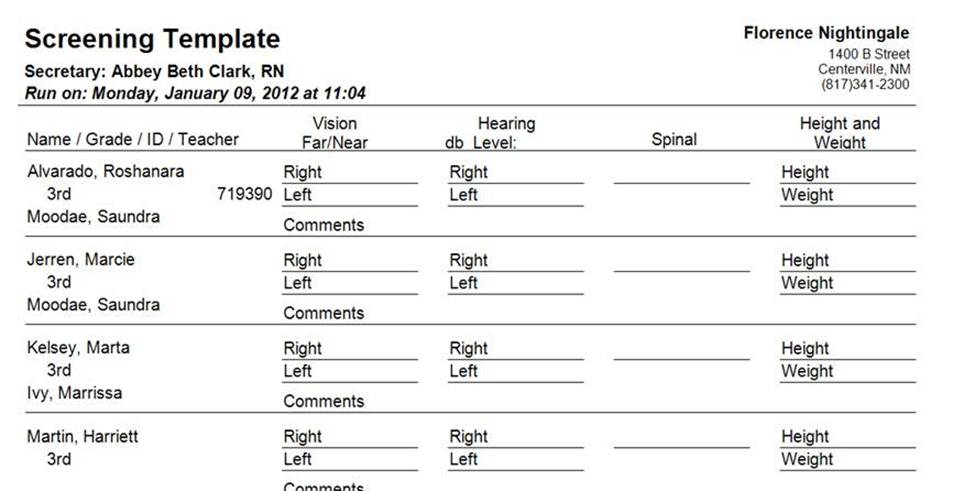
Template for recording screening results:
Have you found the template that might be helpful for recording screening results?
Go to Administrative Tasks / Reports (tab) / Students
(radio button) / Screening Template. Then go to
Selections (tab) and choose the Student’s Grade that
you are screening.
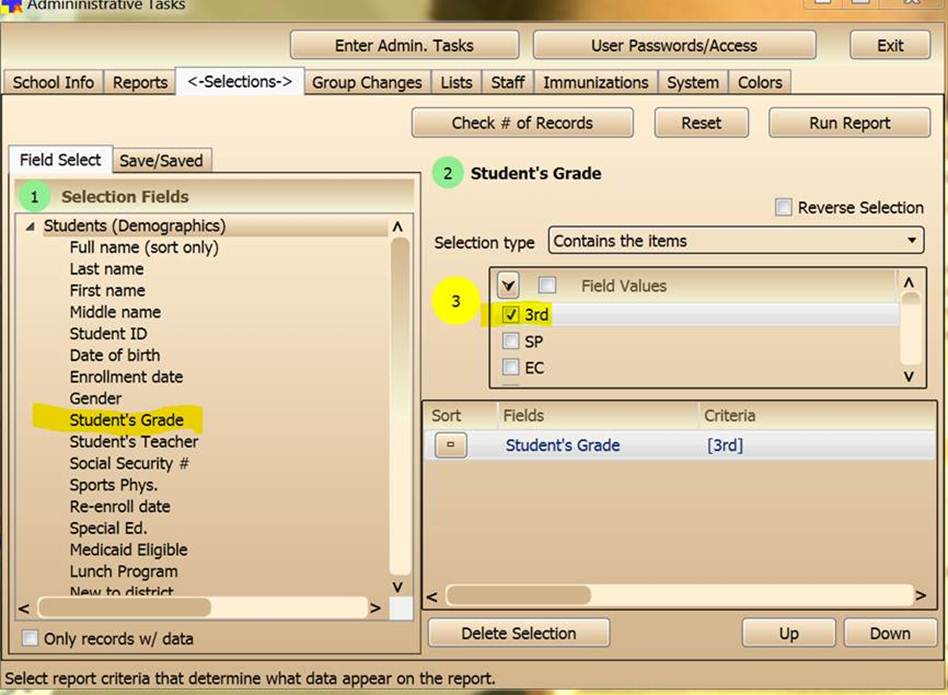
You’ll get a list of the students in that grade and a place to put their screening
results; then you can enter those who have identical results, by screening type,
as a group in your Nurse’s Aide program.
Return to top
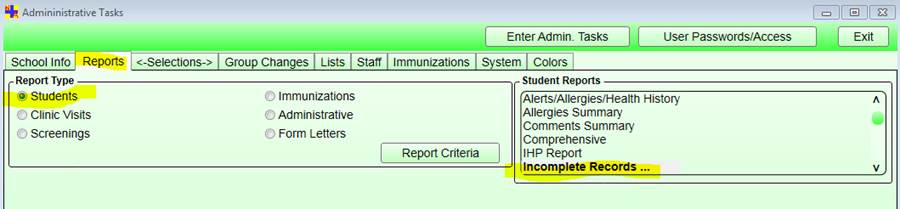
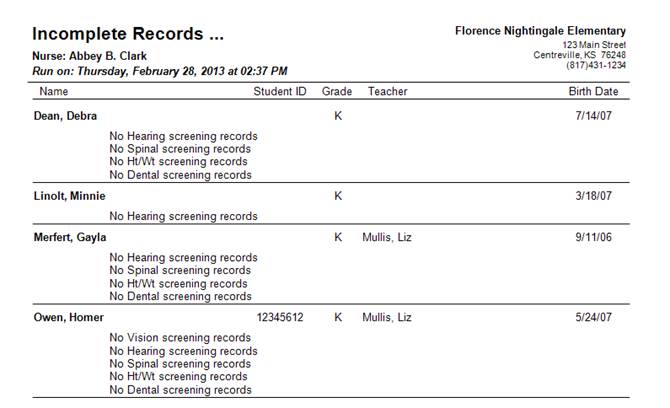
HOW DO I: find students without screenings?
The task is to get a list of all students who are missing one or more screenings;
here are the steps to get an Incomplete Records report.
Administrative Tasks"
Reports / Students (you might think it would be the Screenings radio
button, but stay with me on this)
Incomplete Records…
Selections
Optional: you might want to choose Student’s Grade Grade as a
selection criterion.
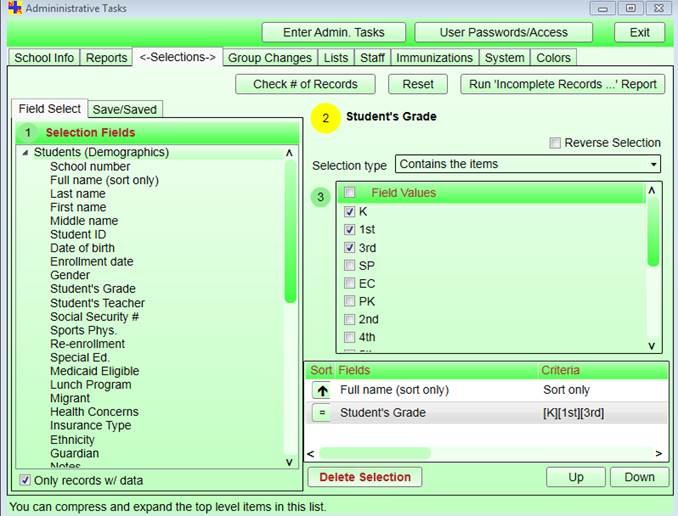
Click on Run ‘Incomplete Records…’ Report. And then click on
Run Report.
A small screen should come up. On it choose the Screenings you want
included, the date range and click on the No Records
box. (No other boxes should be checked.)

You should get a report with data similar-looking to this.
Return to top
HOW DO I: send out screening notices to a group of students?
The first step is to be sure the Screening Notice that you want
to use is set up and listed as first in your list of all screening notices.
Go to Administrative Tasks / Reports / Form Letters / Screening Notice
. On the right under Form Letters, choose the notice that you want to
use.
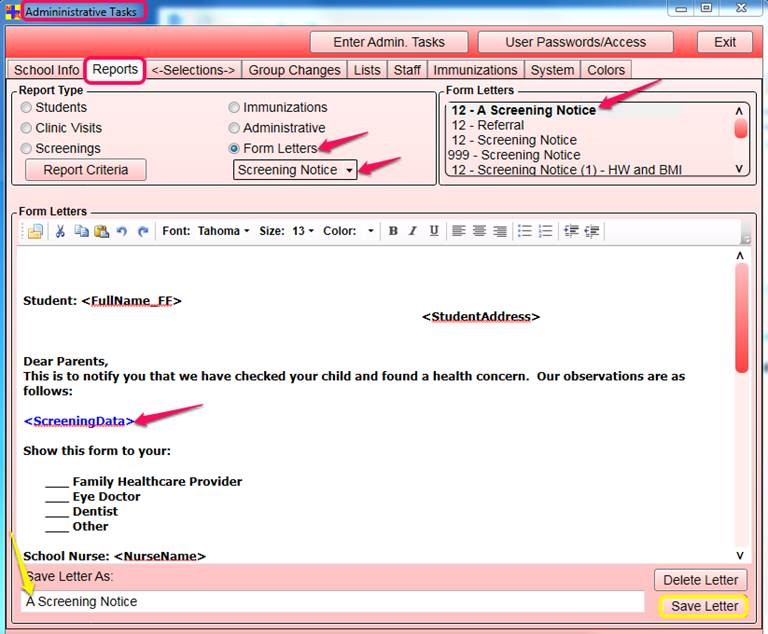
Note: If the notice you have chosen is NOT at the top of the list, add
an 'A' in front of it (and then click on Save Letter) so that it will
be put at the top of the list. That is what determines which notice will be used when
you are sending it out to a group of students.
If you want the notice to include the child’s screening results data, add the
<ScreeningData> tag (exactly as shown).
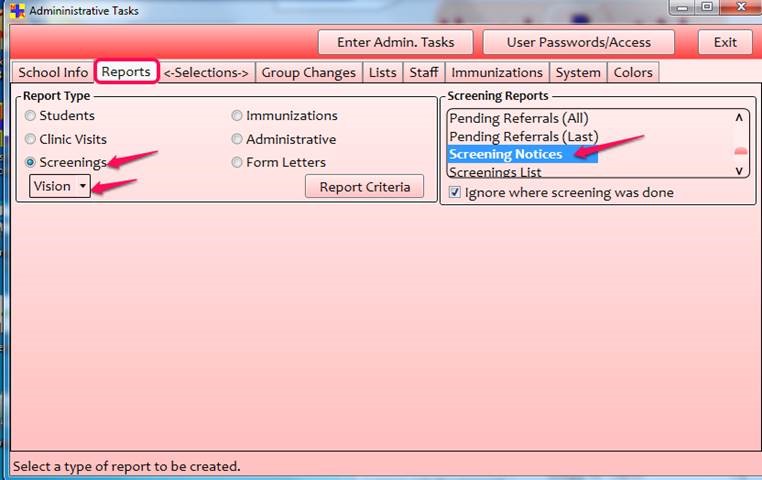
Now, select the report that will print this notice. To do that, on the
Administrative Tasks / Reports tab, click on Screenings and
below it, the type of screening. On the right, choose Screening Notices.
The next step is to select the students to whom this notice will be sent. Click on the
Selections tab. Here you can select which student screenings you want
to see. For instance, you may want only the screenings done this year, in which case
you would click on Screening date and then on This school year
. You’ll also probably want to select by those screenings which you referred
for follow-up.
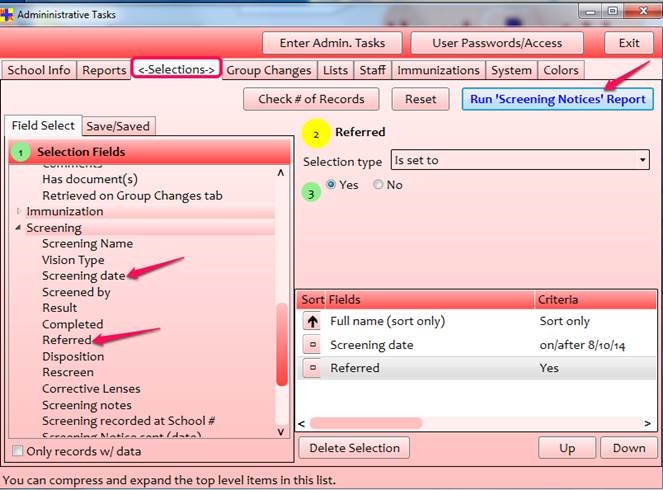
Upon clicking on Run 'Screening Notices' Report and then on Run
Report again, you’ll first see a list of the students for whom your notice has
been generated. When you move it out of the way, you’ll then see the individual notices
for those students.
Return to top
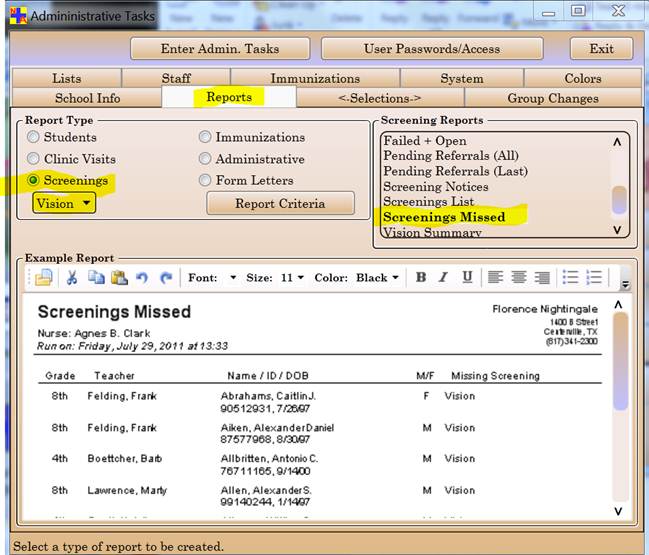
HOW DO I: get screening results and reports?
There are many screening reports to choose from in your NA software, but I’ll go over
a couple here, which should then give you confidence to experiment with the others.
Once your measurements have been entered, either individually or as a group, you might first
want to check to see if you’ve missed anyone. Let’s use Vision, for an example.
Start at Administrative Tasks.
Click on the tab for Reports.
Click on the radio button for Screenings.
Just below, choose Vision from the drop-down list of screenings.
On the right, choose Screenings Missed (you may be able to see an example of this report in
the lower half of the screen).
Click on either Report Criteria or the Selections tab
(they both take you to the same next screen).
You will see that 2 criteria have already been chosen:
1) Screening date which will be your start of school date
2) Full name (sort only) which will put the student names in
alphabetical order.
You may also want to restrict the report data by choosing, for instance,one or more grades
or teachers. If you only screened grades K, 1 and 3, you would choose those under Field
Values:
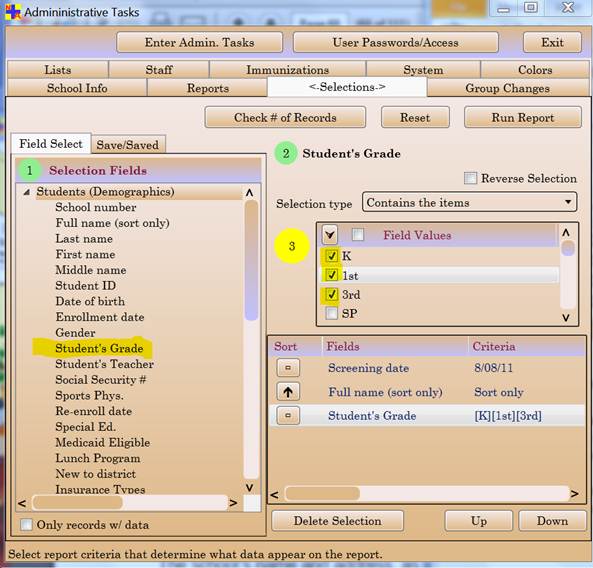
[Note: If the list of drop down choices has now covered up the box in the lower right
corner, simply click on the number 3 to shrink the list so that you can again see your
list of chosen criteria.]
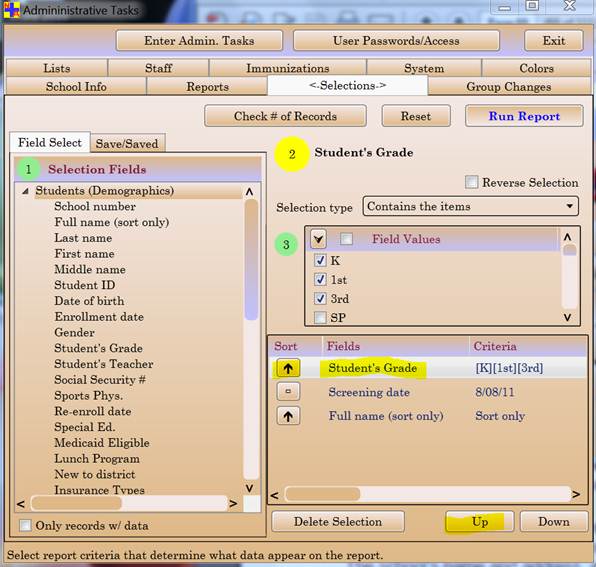
Left this way, students in all 3 grades would be listed in alphabetical order. Let’s say,
however, that you’d prefer to have the students first ordered by grade, and then
alphabetically within each grade. To get that, click on the Student's Grade
line and then click on Up until Student’s Grade is at the top
of your list. Then click in the box in the column under Sort so that an
arrow appears, designating either ascending (up arrow) or descending (down arrow) order.
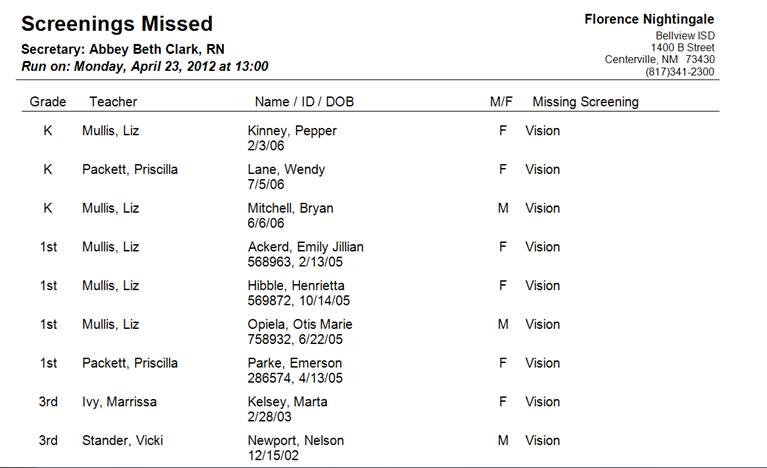
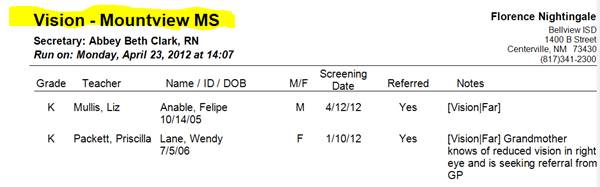
Click on Run Report (twice). You should get a list that looks something
like this:
From here it’s easy to retrace your steps and this time choose another type of report for
the same group of students. This time you might want to look at the All Referrals
or the Failed (Last) report. To do that, go back to the
Reports tab and choose the appropriate report on the right. Go to the
Selections tab. Since you have not changed them, the criteria selections should
be the same as they were for the last report.
Keep in mind that you will always get a preview of the report, so it won’t hurt to play
around until you find the report that will give you what you’re looking for.
Tip -- When you get to the Report Preparation screen
(below), you can change the name of the report. For instance, here I changed the title to
'Vision - Mountview MS':
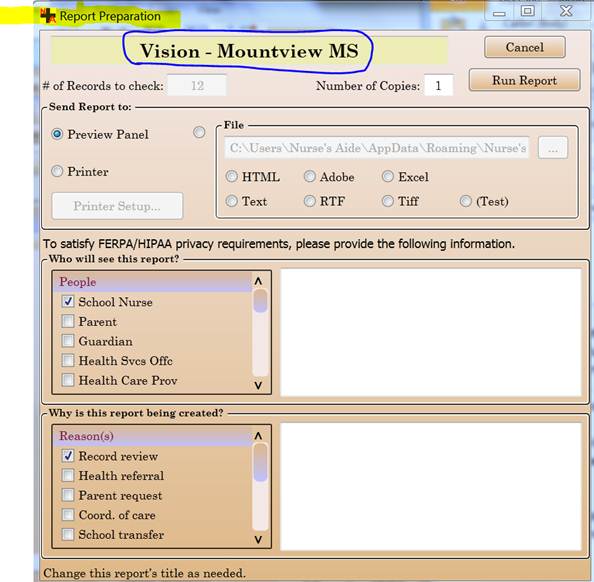
It will look like this on the report itself:
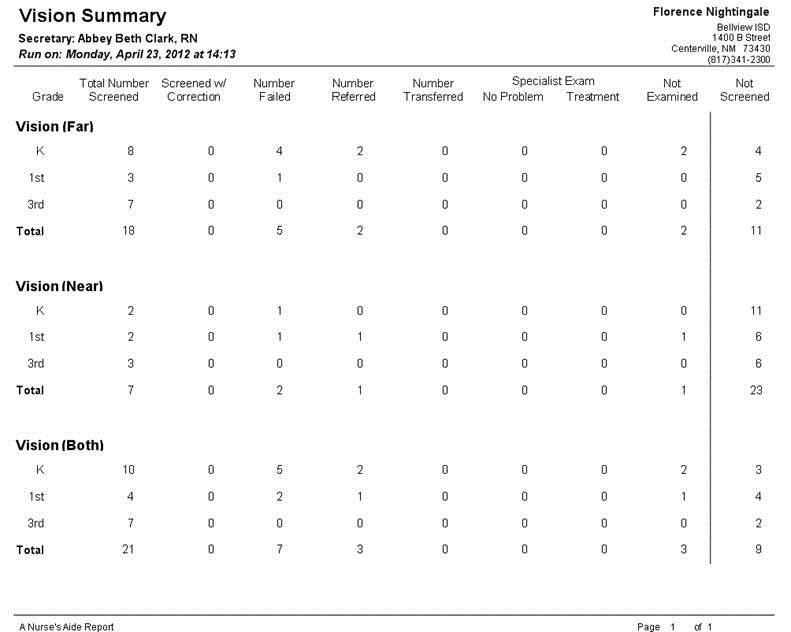
You might want to look at the Vision Summary report – it will give you
several types of totals (rather than individual student names) for the screenings you
have done.
Return to top
HOW DO I: send out immunization notices to a group of students?
For an example, I’ll be looking for a list of students entering the 7th grade
who will need a Tdap. Here’s how to do it:
1. On the Control Panel, click on Administrative Tasks

2. Click on the Reports tab
3. Click on the Immunizations radio button
4. Click on Immunization Notices
5. In the Assessment date field, enter the date that school will
start in the fall (or any other future date by which you want to see students who
will need the vaccine). Note: to make sure this is considered by the program to be
in the next school year, it must be at least one year after last year’s school start
date.

6. Click on Report Criteria, or the Selections
tab (they go to the same place).
7. On the left, click on Student’s Grade and then on the right,
choose the grade(s) that students are in now. In this example, you’d choose 6th which
is the current grade of the students for whom you want to create the notice.
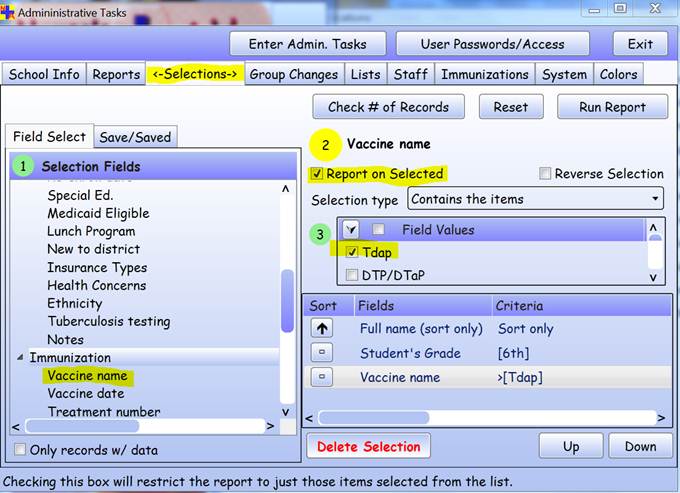
8. Again on the left, go down to the Immunization heading and
choose Vaccine name. On the right, choose the specific vaccine; in
this case it would be Tdap.
9. Here’s a very important step: check the box in front of Report on
Selected. This will restrict the report to just the selected vaccine(s).
10. In order to see what criteria you have chosen, click on the circled 3, so that
you can see the grid in the lower right corner.
11. Click on Run Report (twice).
What you’ll get is a list of students who will need the vaccine...
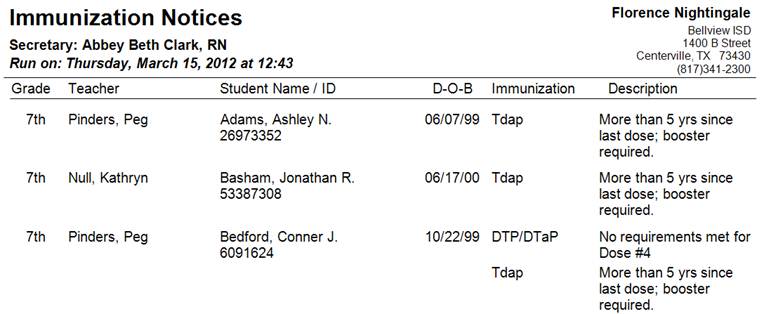
… and behind that, you’ll see an individualized Immunization Notice for each student
along with the student’s shot record. Print the ones you want to send.

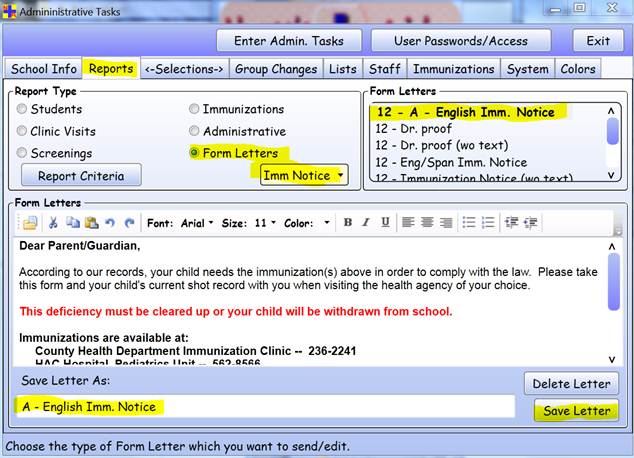
Note: If you have more than one Imms Notice, the one that is at the
top of your list will be the one that is used when you are creating a group of
notices thru’ the above process. To be sure the one you want is at the top of your
list, go to Administrative Tasks / Reports / Form Letters / Imm Notice
. Pick the one you want and put an A in front of its name so that the
program will recognize it as the one at the beginning of the alphabetized list and use
it for the group notices. Be sure to Save Letter before exiting.
Return to top
HOW DO I: save selection criteria for a report?
If you have the need to create the same report repeatedly, for instance at the
end of each month, you might find it useful to save the criteria that you need for
that report. You can now do that with a new tab found on the Selections
tab within Clinic Visits. For instance, here I am setting
up to run a Visits Summary Report in which I want to include all the
students who have been in for any of four types of visits during the month of October.
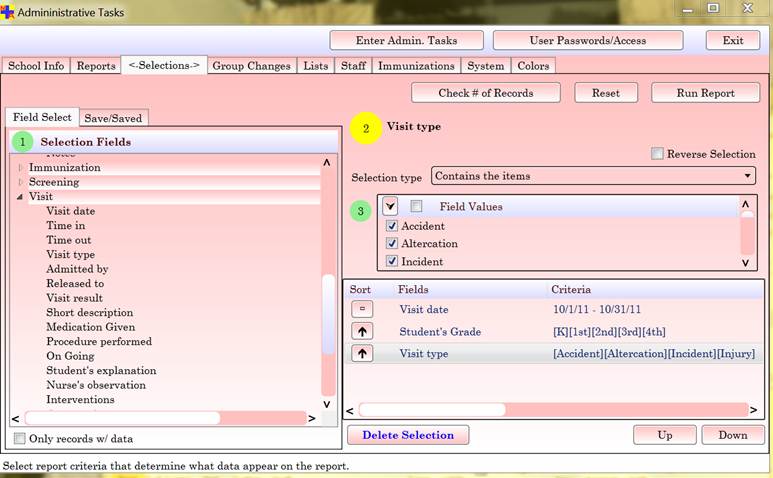
Knowing that I am going to have to run this report each month, I can click on the
Save/Saved tab (to the right of Field Select), give
this report a name and retain these criteria for the next time I run the report.

Return to top
HOW DO I: use e-mail to send out reports?
While it has been possible for a long time to create report files from within
Nurse’s Aide that could then be sent as attachments to an e-mail, we have made that
process a lot easier. It is possible to send an e-mail directly from the report
preparation form. This document explains how you can enable this facility as well as
things you need to keep in mind when using it.
First of all, the reason this was not immediately available in our program is due to
privacy concerns. We didn’t want to allow users of our program to indiscriminately
send our any report to anyone. That could be a disaster. But after thinking about
what we could do, we decided that we could allow the user to send out reports that only
had to do with a single student. Of course it is still possible to send out a record
containing Johnny Jones’ visit data to Jimmy Jones’ mother, but the chances of that are
not too great, and the user will need to assume responsibility for that.
To enable this capability, several things need to be set up in your Nurse’s Aide program.
First, you need to set up the e-mail settings. This is done through Administrative Tasks
> Lists > Values > E-mail settings. This is what you should see:

Each of the items in the list on the right needs to be set. Here is an example of what
the settings might be:
IP Address: |
gmail.com |
Login ID: |
Barbara@NursesAide.net |
Login Password: |
associatedPassword |
SMTP Port: |
25 |
This information can be provided by your tech person or your IT department. This
information is used to actually communicate with your e-mail provider. If it is
incomplete or inaccurate, the e-mails will not be able to be sent.
The next thing you need to do is specify your individual e-mail address. This is
done in Administrative Tasks > School Info, in the E-mail
field, as shown here:
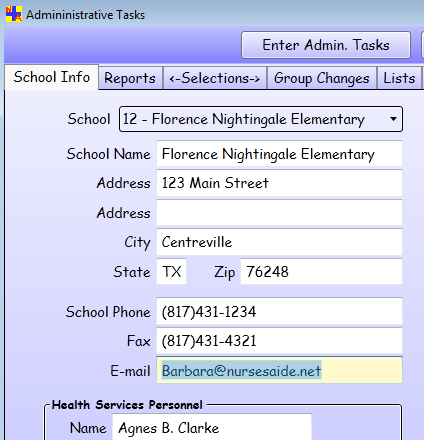
Since the people to whom you will be sending e-mails may want to respond to you, it
is important that you put into this field the e-mail address that you want to use
for such communications.
This is all you have to have to enable e-mailing of Nurse’s Aide reports. However
you will find it beneficial for some students to fill in e-mail information for
their contacts. For example, if you regularly see Nicholas Algood in your clinic
and want to e-mail some of these visit records to his mother, it would be easier to
enter that information in the contact record rather than entering it each time you
want to send an e-mail. Here is where this would be done (Student
Information > Contacts):
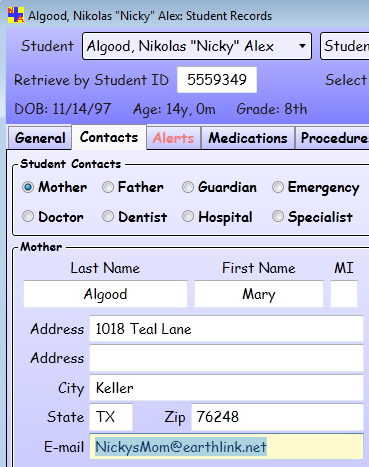
When you are presented with the opportunity to send out a report as an e-mail
attachment (see below), all of the e-mail addresses for all of that student’s contacts
are listed so that you can choose which ones are to receive the e-mail.
Once all of the above steps are completed, you will be able to see the option to send
out e-mail reports, but only when you are submitting the report from within
Student Information or from a Clinic Visit form. This option
will not be available if the report is submitted via Administrative Tasks
. So, provided you are submitting the report from one of the allowed sources,
the report preparation form will now contain a new entry (E-mail this report
), as shown here:
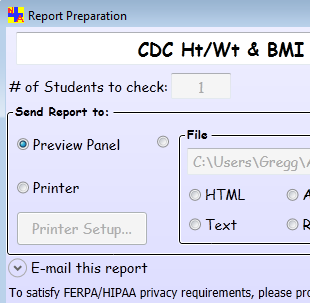
Click the little down arrow inside the circular button to see all of the options
available to you. Here is what it looks like after it has been opened and a few
selections have been made:
As you can see, there is a line that will allow you to enter an e-mail address
that is not already in the list. You can even save this e-mail address for future
use. For example, you may want to include your school principal or nurse
administrator on some correspondences.
In the area labeled E-mail body text, you can select from a list of
stored texts that you or your school district might create for various purposes
(screenings, visits, immunizations, etc.). These are created and stored in the same
place as form letters, namely Administrative Tasks > Reports > Form letters >
E-mail text. However, even if you select one of these stored texts, you can
still edit it at this point.
In order to actually send out the e-mail with the report attached, all you absolutely
need to do is select one or more recipients. Once this is done, continue in the way
you always do to create reports and press the Run Report button. The
report will be generated and displayed, and you will also be shown the e-mail form.
This is displayed so that you can check the information and confirm that this is what
you really want to do. It looks like this:
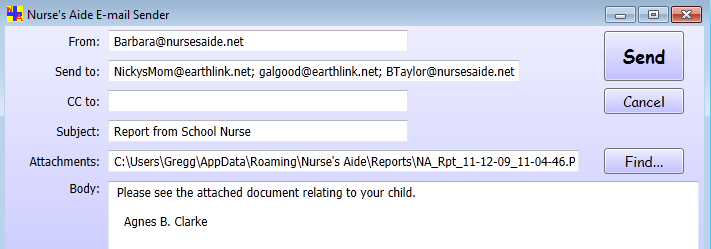
You can edit these fields if you want to at this point. If you are happy with this
e-mail, press the Send button to actually deliver the e-mail and
attachment.
Return to top
HOW DO I: include (embed) specific data in a form or letter?
Of course you know that Nurse’s Aide is highly customizable in that you can design
your own lists, forms, letters, reminders, templates and reports. What you may not have
discovered is that you have the capability of embedding specific data in your custom
forms and letters. For instance, if you are sending a screening notice, you can
personalize each one by not only addressing it to the child’s parent or guardian, but by
also including the child’s screening results in the letter. And of course an
Immunizations Notice could list what vaccines the child needs as well as a copy of their
Immunizations Record.
But did you know that other data can be inserted as well? This came up recently when a
user requested that the child’s mother/father/guardian phone contact information be
included in a child’s EAP.
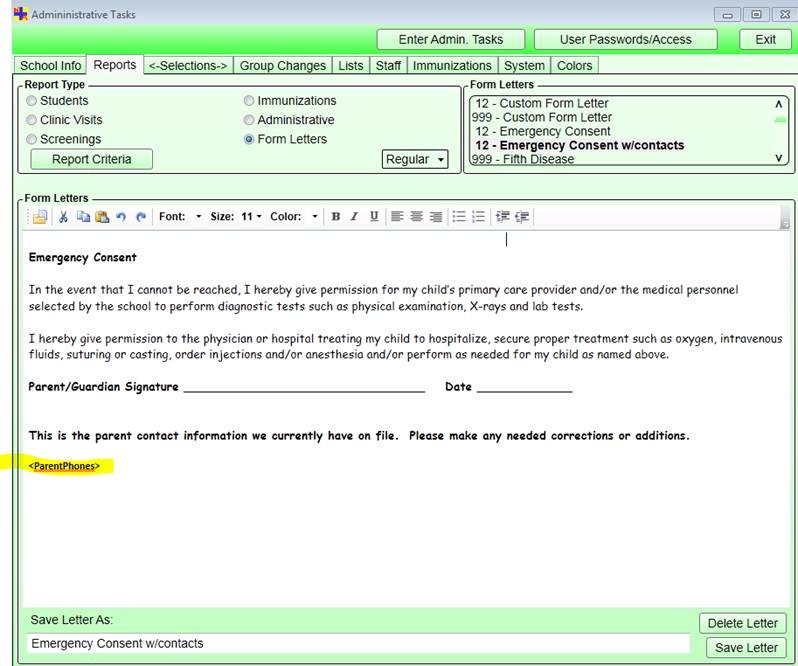
Here’s what I’m talking about. This is an example of an Emergency Consent
form in which I wanted to include the parent phone contact information that we
have on file. This is how it would be set up in Administrative Tasks / Reports / Form
Letters / Regular (note the highlighted <tag> at the bottom):
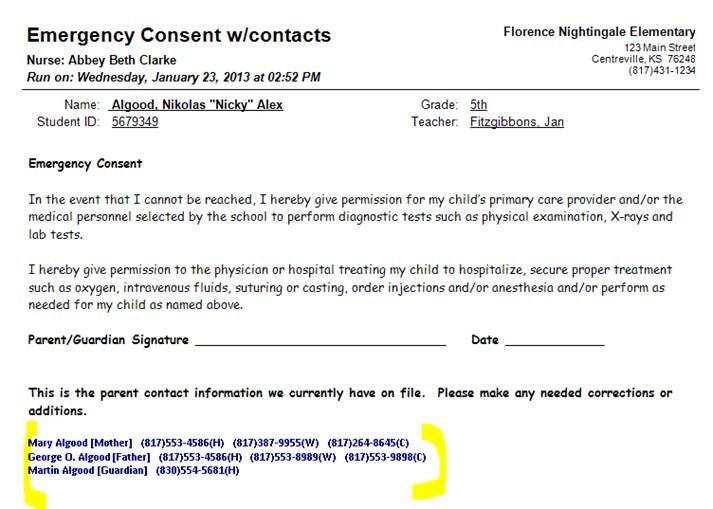
And this is how it would look when created for a particular child:
Here’s the important part: if you want to embed data, you MUST insert
the EXACT words below (and always within angle brackets <>), in order
for the program to recognize what you want. These are the possibilities:
<TodaysDate>
<FullName_FF>
<FullName>
<DOB>
<Student_ID>
<StudentAddress>
<SchoolName>
<Grade>
<NurseName>
<TeacherName>
<TeacherName_FF>
<ParentPhones>
<ImmunizationsList>
<ImmsNeeded>
These <tags> may be inserted anywhere in the form letter and you may use as many as you
want. For example, you could embed the following in a form letter:
<FullName_FF>
Student ID: <Student_ID>
Birth date: <DOB>
Grade: <Grade>
Here’s how the above would look in the document:
Alexandra E. Martinez
Student ID: 8496319
Birth date: 8/22/99
Grade: 7th
Notice how I can choose the color, font size and bolding that will be used.
Return to top
HOW DO I: document administrative tasks?
Did you know you can document in Nurse’s Aide how much time you spend on various
responsibilities that aren’t directly related to student/staff visits? Tasks such as
ordering supplies, attending meetings, paperwork, conferences with parents or staff,
training etc. may take up a surprising number of minutes (hours?) in your day. It’s
easy to chart these duties and easy to run a report on them when needed.
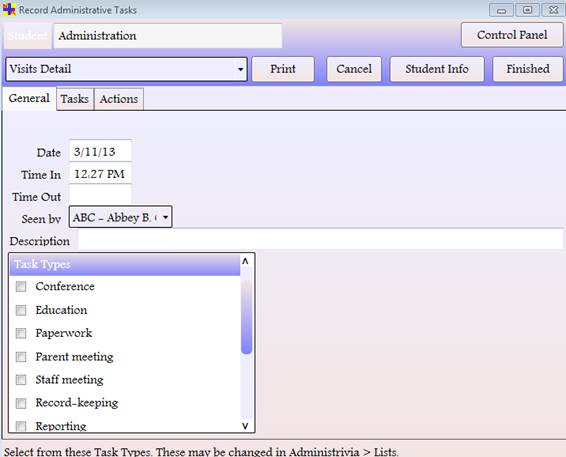
To chart, choose Administrative Tasks
on the
Control Panel. On the next screen, click on Enter
Admin. Tasks
.

On the next screen, choose from the list of Task Types. (This is a
customizable list, so if what you need isn’t there, it can be added by going to
Administrative Tasks / Lists / Administrative Tasks).
Go to the Tasks and Actions tabs if you want to add
specific details about what was done.
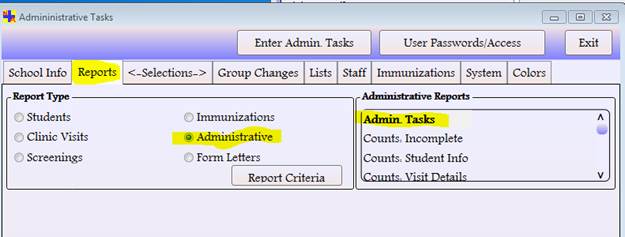
If you want to run a report on these tasks, go to Administrative Tasks / Reports
/ Administrative / Admin. Tasks:
Return to top
HOW DO I: use the To-Do clock?
Upon opening your Nurse’s Aide program, the first screen you’ll see is the
To-Do Clock screen. Besides some helpful reminders, you’ll see the smiley face
clock which does tell you the time – here it shows that it’s 9:39. But if you don’t think
he’s as cute as we do, you can erase him by going to Administrative Tasks / Lists
/ Values / Preferences / Show clock on To-Do form / No.
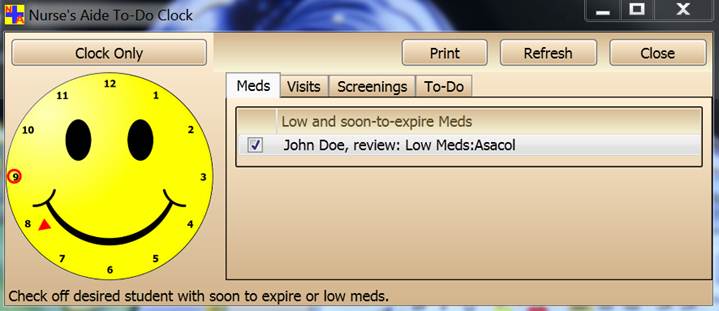
There are 4 tabs which identify the different kinds of reminders:
Meds -- you’ll see any medication that is either low (down to 10% of the
original Received amount) or about to expire.
Visits -- you’ll see any visit on which on which you have clicked the
On-going check box in order to be reminded to follow-up on a visit.
Screenings -- lists any screening which are not Completed.
To-Do -- allows you to create your own custom reminder for yourself.
For each item listed on all tabs, simply clicking in the box on the left will take you
to the screen where you can make changes as needed.
When you’re done with the To-Do list, you can close it, and always come
back to it by clicking on Needs Attention on the Control Panel
.

Return to top
HOW DO I: set up for the Medicaid Billable report?
It's easy to keep track of Medicaid billable records in Nurse's Aide
. Here’s how:
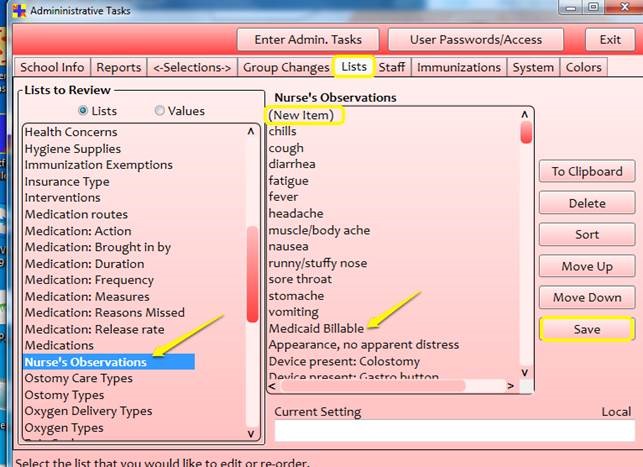
1. The first step is to be sure there is a choice called 'Medicaid Billable' in your
list of Assessments. To check, go to Administrative Tasks / Lists / Nurse’s
Observations. It may already be in your list, but if it isn’t, click on
(New Item) at the top and add it. Be sure to click on Save
before exiting this screen
2. Marking the records is done within Clinic Visits. Open and chart
a visit as usual, being sure to click on the choice of 'Medicaid Billable' on the
Assessments tab. That’s all it takes to make that visit appear on a
Medicaid Billable report.

3. When you want to run a report to find visits which are Medicaid Billable, here’s how:
Go to Administrative Tasks / Reports / Students / Medicaid Billable.
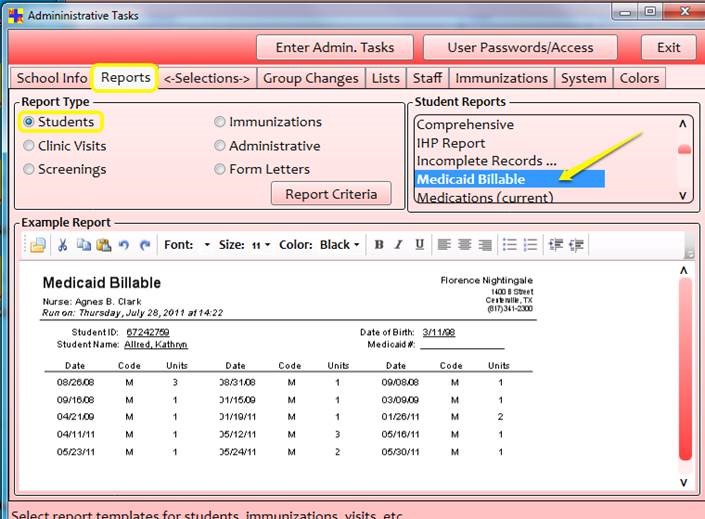
Then on the Selections tab, you can choose criteria (such as date range)
to determine your report results.
Other things to note:
On the report itself, the 'M' indicates that a student came in and was given a medication.
The number of units indicates the number of medication visits on a particular day.
The 'I' indicates any visits in which a medication was not given
on a particular day. If there was a med given on that day, there will not
also be a visit recorded as well. So for any given date there could be either
an 'M' or and 'I', but not both. The 'I' only appears if there was a non-med visit
and" there is not an 'M' for that date.
The number associated with the 'I' is the number of 15 minute intervals
that the student spent in the clinic. For instance, 1:01 (one hour and one minute) would
yield 4, 1:08 (over half of 15 minutes in the last interval) would yield 5. A visit
lasting less than 8 minutes will not show up on the report (the name appears but there is
no notation under it).
Return to top
HOW DO I: run the Nurse's Time (Range) report?
Recently a nurse called with a request for help with an interesting question. She
wondered if there was a higher frequency of visits to her clinic during the days of
state testing. So she wanted to compare a specific span of time (preparing for and
taking the test) with a same span of days both before and after the testing weeks. She
was using our Nurse’s Time report but was having trouble getting the
specific dates she wanted. So we added another report that not only allows for easily
entering dates, but also gives the number of visits and number of minutes that were
spent in visits from teachers and other staff.
If you are currently on Version 4.12F or better, you should find the new report under
Administrative Tasks / Reports / Administrative / Nurse’s Time (Range):
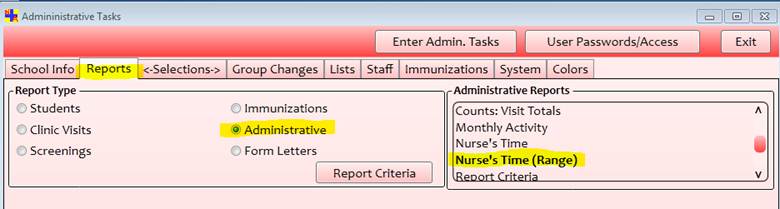
Next, go to the Selections tab and fill in the visits date range (as
well as any other criteria you want to include):
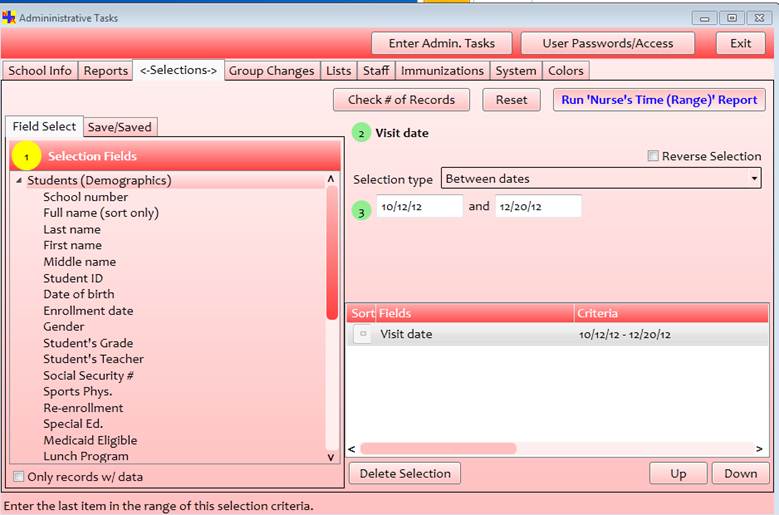
Your report will look something like this (the newly added data is highlighted):

To compare this report with other dates, simply go back to the Selections
tab and change the dates.
Return to top
